Superbowl Oatmeal Chocolate Chip Cookies

In my senior year of high school I got this wild baking idea: I would make chocolate chip cookies for the varsity football team during their playing season.

Every Thursday evening after our family’s supper I would gather all my ingredients in preparation for an evening of baking.  Then I’d painstakingly cream butter and sugar together, add the eggs and vanilla, sift dry ingredients then combine all these ingredients together - by hand.  Gently I would drop spoonfuls of dough onto baking sheets and spend what seemed like hours baking.  After they came out of the oven I would set them on racks to cool. Then I would count them out by the dozen placing them in perfectly even rows.  

Not one family member was to touch them until I knew the end count.  

Finally, I would  dole them out into bags.  When Friday morning arrived I’d proudly take those bags to school and hand them out to “my” team.  

My well intentioned weekly project got the better of me when finally after several games one of the guys came up to me and said, “Beth, we love you and the cookies you make for us but we can’t eat them before or after the game because it might make us sick.”

So, with a bittersweet memory and the craving for sugar and chocolate I give you a fail safe recipe for the best Super Bowl Oatmeal Chocolate Chip Cookie.

Here’s to the end of football season but not my cookie making pleasure! 

Ingredients

1 stick + 6 Tbls of unsalted butter, soften to room temperature
3/4 C Turbinado or Raw Cane sugar
1/2 C granulated sugar
3 large eggs - whole
1/2 tsp vanilla
1 1/2 C all purpose flour
1 tsp baking powder
1/2 tsp cinnamon powder
1/2 tsp ginger powder
3/4 tsp kosher salt
3 C old fashioned oats
2 C chocolate chips

Process

Pre-heat oven 350F

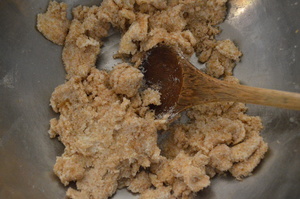
Cream butter and sugar together in a large bowl.

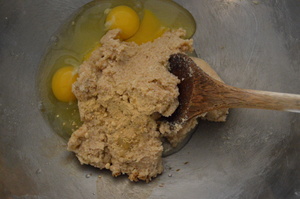
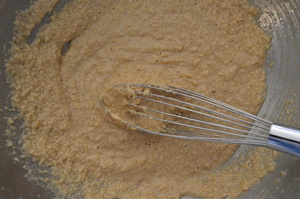
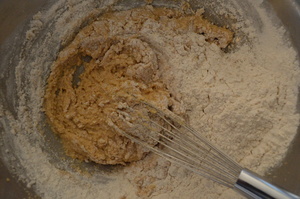
Add eggs, vanilla and stir to incorporate all ingredients. It does not have to be perfectly smooth. However, I used a whisk which helps break up the bigger pieces of butter and or sugar.

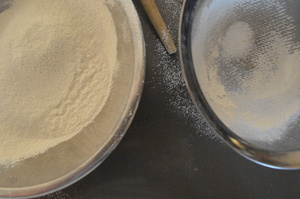
In a separate bowl sift together flour, baking powder, cinnamon, ginger and salt. Then gently add into liquid mixture and stir to combine.

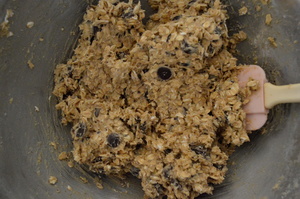
With a spatula scrape the inside of the bowl to incorporate all the flour mixture into the liquid. Once thoroughly mixed add your old fashioned oats and chocolate.  Fold all ingredients into the other.

Using a 2” wide ice-cream scoop, fill it with dough and level the top off.  Place measured dough onto a parchment papered half baking sheet; 2 rows of 3.

Place into the preheated oven, center of the middle shelf and bake for 12 minutes.  Open oven, rotate sheet once (back to front), close oven and bake for 5 minutes.  Take cookies out of oven, set aside to cool.  Repeat until the cookie dough is gone.

Eat with abandon! 

Yields 21 - 3 1/4” cookies.

Tips

*I used 60% cocoa bittersweet chocolate.  It lends a more distinctive intense chocolate flavor to the cookie itself.

*Since these chocolate chips were larger I did a quick chop to make them go further.

*Notice (see pictures above) how I used 3 different tools to mix; wooden spoon, whisk and spatula.  I DID make this batch of cookies by hand and I wanted to show you the progression of mixing tools which was contigent on how I had to mix and what would work best as the mixture progressed.  Obviously you can use a standing mixer like a KitchenAid. It does make life easier.

* I took some major liberties by adding & exchanging some ingredients.  And you can too! I did follow the basic oatmeal cookie recipe you’ll find on the inside top of the Quaker Oats Oatmeal container.  

A Thanksgiving Side Dish: Sauté of Chard, Purple Kale & Broccoli Rabe

Cooking Thanksgiving dinner can be a whole lotta fun and often times a stressor of sorts; what to make (excluding the obvious), how to make it, will there be enough food, will everything come out at the same time etc…etc…etc…  Over the years I’ve made it a point to simplify. Which means someone else has the responsibility of cooking the turkey and I the sides.

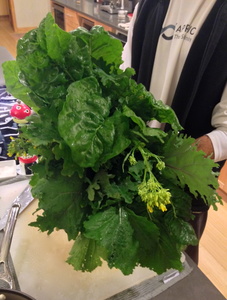
So last night Mike walked in from the garden with an armful of greens; a veritable bouquet of Chard, Purple Kale & Broccoli Rabe. 

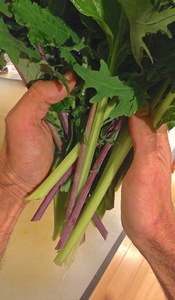
Gorgeous! The purple stems are purple kale.

Mike, who is a good cook himself (he cooks the turkey), proceeded to prep the greens for cooking by chopping the stems very small so that they would cook quickly.  

He then continued on to the leaves with a rough chop (bigger pieces than the stems). And put all the prepped greens into a sauté pan.

Then onto the stove it went.  

A Sauté of Greens is a fresh, simple and quick way to complement the Thanksgiving Day Dinner; no matter who cooks it!


Here’s the recipe.

Ingredients

1 lb of your favorite green, rough chop (stems optional - chopped very small)
1 Tbls of extra virgin olive oil
2 tsp of kosher salt
1/2 tsp of fresh ground pepper

Process

Turn your stove burner to medium high.  Place a large sauté pan on that burner and add olive oil.  While olive oil is heating add your greens and sprinkle salt and pepper on top.  Begin turning the greens over and over until they begin wilting. Once they have cooked down, turn the stove down to low, cover and cook for 5 to 10 more minutes or until greens soften but still have a crunch (yes you must test).  Once done ladle greens out into a bowl and serve immediately.  

Yields 6 side servings.

Halloween Decor

While I wouldn’t say I’m a Halloween lover there are a few things that I do like to keep in fashion around my house, Casa Pav.  And that is the decor that in itself demontrates the holiday.  

When I first began picking up pieces for my Halloween decor I had kids in mind.  My husband and I were working on the “task” of having children and I felt like I should start preparing by buying all sorts of fun holiday decor pieces.  Which goes right in line with my MO; not being too practical.  I was all about the surface decoration rather than the real inside preparedness of having a child.   

Living Room

Sadly, the kid thing didn’t work out for us.  However, the decor did and still does.  It’s sure not a replacement.  But it does make me feel good to have a few designated pieces of Halloween or that which demonstrates it placed around my home.  

Dining Room Table

Each piece has it’s place whether outside or inside.  One of my favorites is the candy corn man that sits outside greeting people when they visit.  Another is the witchy pumpkin cat that sits upon the counter in the guest bathroom.

Guest Bathroom

So, for not having a pure love for Halloween I think I’m doing pretty good.  I keep the decor simple; a little elegant and weirdly somewhat full of smiles.  

Happy Halloween from Casa Pav - sans kids!

Boursin Cheese, Homemade

Let’s face it, Boursin cheese is one of the best flavored cheeses around.  It’s an airy, buttery and herb cacophony that bursts open on your tongue.  Then melts to nothingness leaving you wanting more and more and more…

The first time I ever tried Boursin, I made it myself.  I had been hired, whilst in culinary school, to help cook for a small catering event.  I was instructed to make an appetizer of baby potato w/ a dollop of boursin cheese; a finger food to pop into your mouth in one bite. I was told that buying Boursin was fine (and delicious) but based on the amount we needed making it would be just as easy. So there I was making a batch of Boursin.  

In truth, and in a pinch, I do buy Boursin.  Making it though is an infinate treat.  I made some for a dinner party this weekend.  With herbs still growing in our gardens all I needed  was a few ingredients from the market.  Can you name all the herbs?

Here’s the recipe.  I hope you enjoy it as much as I do.

Ingredients

1/2 pound (2 sticks) unsalted butter, room temperature
16 ounces (2 packages) cream cheese, room temperature
1/8 C of whole whipping cream
12 stems of thyme, leaves only
3—4 sage leaves
5 3” sprigs of majoram, leaves only
1 3” sprig of rosemary, needles only
1 4” sprig of tarrogon (or Mexican marigold), leaves only
15 chives, minced
2 medium cloves fresh garlic
1 tsp kosher salt
1/2 tsp freshly ground black pepper

Process

Place all ingredients in a food processor.  Process untill all ingredients incorporate and the mixture becomes a smooth paste.  Pour into an airtight container.  Can be stored in the refrigerator for up to 2 weeks.

Tips & Uses
*Bring to room temperature to soften.
*To melt, place in microwave for a few minutes, checking and stirring at intervals.
*Can be used as a spread and/or dipping sauce.

dsc_0317_580.jpg

Tomato, Basil, Aioli & Olive Bread Sandwich

Tomato season is all but over here in Texas.  We have a few months each year that produce some pretty luscious fruits. These colorful globes can be picked right from the vine and popped into the mouth. Their sun-kissed warmth, acidity and juiciness just about make any dish delightful to the eye; not too mention devoured.

This sandwich is one of my favorites.  It’s best made during tomato season and with a fresh made loaf of olive bread.  

As summer ends this is my final farewell to the Tomato, Basil, Aioli & Olive Bread Sandwich.  Until next year’s tomato harvest….

Ingredients

2 slices of fresh olive bread, 1/4”-1/” slices
1 Tbls of aioli (or your favorite mayo)
1 medium vine ripened tomato, sliced 1/4” thick
Pinch of salt and pepper
4 large basil leaves 

Process

Take 1/2 of the aioli and spread evenly on one piece of bread.  Repeat process on 2nd piece of bread.  Lay each piece of bread side by side.  On one slice of bread place 3 slices of tomato so that it covers the entire piece of bread.  Sprinkle salt and pepper on tomatoes.  On top of tomato place basil leaves.  Place 2nd slice of bread on top of basil leaves.  Gently press down.  Cut sandwich down the center for 2 pieces.  Eat immediately.  Enjoy!

Yields 1 sandwich.