Tuesday Tip: Fat — To Have or Have Not?

And that’s a good question, right?  In one of my restaurant jobs I used to cook a pork tenderloin (or more) a day.  Since we butchered in-house we were able to keep as much fat on the tenderloin as we could.  It was really cool. Not only to butcher but also have the opportunity to choose the amount of natural fat we wanted to cook with.  The resounding philosophy being “fat=flavor”.  And it’s true!  In all the years I’ve been cooking and teaching I’ve always adhered to that philosophy. And with eating moderately it’s worked for me.  That said my metabolism has changed as I’ve matured. So what do I do?  I still cook with fat but then I remove it.  Therefore, keeping the flavor and removing the added fat and high caloric content. 

Last week I made pork butt in a crock pot.  I didn’t trim the meat.  Consequently there was a fair amount of fat when said and done.  Here’s what I did:

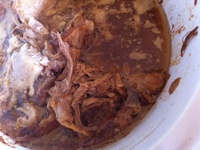
After the meat had cooked I let it cool to room temperature.  I then placed it (covered & in the same crock it cooked in) into the refrigerator overnight.  In the morning I took the crock out of the refrigerator.  Took the lid off the crock.  With a large spoon or spatula skimmed the layer of fat that had congealed while in the refrigerator.  As you can see in this picture the fat layer is white.  Place the fat in another container (for later use) or dispose it. 

And that’s your Tuesday Tip.  One easy way to keep flavor while removing fat (from any protein) after it has been cooked.  It’s just my way of getting around the question of “to have or have not”!

Friday Food Find: Asian (Pork) Tacos — In a Crock Pot!

Ok. I know I’ve been corrected numerous times.  It’s not a crock pot anymore but a “slow cooker”.  But come on it’s a crock and a pot (of sorts). Am I right?  Either way the best attribute about this kitchen tool is that it cooks any number of things - very well.  All the while turning your back for hours.  Well, I finally broke down and bought one of these contraptions and have begun to use it.   And that’s after receiving two as wedding gifts and giving them away immediately (18yrs ago). I mean I wasn’t going to be cooking that way. Oh, no!  But here I am now so many years later going to share a slow cooking recipe with you and all you really have to do is plug in.  It’s rocks!  So here’s the recipe.  It’s Asian in nature; a take on Tex-Mex tacos.  The flavor dynamic is just that - dynamic.  Get ready….I think you’re really going to like this one!

Ingredients

6lbs pork butt (some bone in is ok)
3tsp fresh ground pepper
2tsp of kosher salt
7 medium cloves garlic, peeled & smashed
4 bay leaves, dried
3 whole pieces of star anise
5 quarter size pieces of fresh ginger, cleaned of grit (does not have to be peeled if it is clean)
2 4” stalks of lemongrass, cut into 1” pieces
1/2 of large onion, rough chop
1tsp dark sesame oil
2Tbls Mirin
3Tbls Ponzu
1C water

Process

Rub pepper and salt all over the pork butt.  Place into crock pot.  Add next 5 ingredients and arrange them so that they are dispersed below, to the side and above the meat. In other words, all over.  Then pour all liquid ingredients over the meat, vegetable and spices.  Place crock into pot, tightly seal with lid, plug in and turn on.  Depending on how powerful your crock pot it may make a different for the temperature.  I have a very basic one no bells or whistles.  So, I just place mine on HIGH for 2 hours and walk away.  Coming back I turn it down to low for another 3 1/2  for a total of 5 1/2 hours or until the meat breaks away from itself with a fork.  Five and half hours is the magic time for me.  Once fork tender, let the meat cool.  Once cool, drain the liquid and reserve.  Shred the pok with your fingers or with a fork.  Use the reserved liquid to moisten the shredded pork if neccessary.  Your shredded pork is now ready for tacos. 

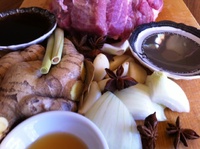
Ingredients, in the crock pot and finished Asian pork. Yields 6-8C of shredded pork.

How to make a taco

Warm a flour or corn tortilla; either over a flame or in the microwave.  Place warmed tortilla flat on a plate.  Place pork 3/4’s down from the top of the tortilla.  Line pork from left to right edge so that it makes a horizontal line.  The amount of pork you use depends on the size of the tortilla.  Generally I always start with 1/2C.  Add anything you like.  I serve this with an Asian slaw.  It adds a nice crunch, lightens the taco and adds another flavor dimension.

I like to have a little garnish too.  Here I’ve used just a little torn flat leaf parsley and some toasted sesame seeds.

Friday Food Find: Sticky Rice with Preserved Lemon & Basil

Here’s the scenario: Husband home late from work, bushed and maybe a little cranky. Wife had worked hard on a recipe that day for her blog post.  Finished dish waiting on the counter as her husband comes through the door. Husband drops work gear, picks up a spoon and  scoops up a generous amount of the sticky white.  He brings it to his mouth and chomps down.  He seems thoughtful…maybe even blissful? And then he says, “Beth, you can make this for me all the time!”

Well now, pretty good praise coming from one of my favorite constructive critics.  So I thought I’d post it for you!

But first I’d like to share that this recipe is certainly not for the faint-of-heart.  Sticky rice has a very distictive texture.  And preserved lemon, while absolutely fabulous, may be an overly strong flavor dynamic for sensitive palates.  That said, this dish is so worth a try. And for those of you who have no concerns about texture and/or strong flavor dynamics this is a must!  Here’s what you use and do.

Ingredients

4C sticky rice
1 medium preserved lemon, rinsed thoroughly & minced
1/4C of fresh basil, rough chop (or more if you really love basil-I suggest another 1/4C)
1tsp of fresh ground pepper
1Tbls of good olive oil
1/4tsp of kosher salt (optional)

Process

Place sticky rice into a medium bowl (sticky rice can be warm or room temperature).  Add preserved lemon, basil, pepper and olive oil.  Mix thoroughly.  Taste for salt level.  Add more salt if you deem necessary.  Otherwise omit. The preserved lemon with lend a deep salty almost briney flavor.  Serve immediately. 

Yields 8 1/2C servings. 

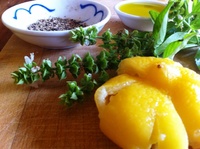
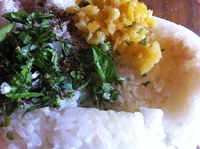
Ingredients, sticky rice and prepped ingredients:

Quick Tips:
*If you have any leftovers, wrap well and place in the refrigerator.  It will last up to 4 days. 
*Remember to gently re-warm leftover rice in the microwave.  This will soften the rice.
*Don’t be afraid to eat the basil if it turns dark.  This happens when you mix the herb into anything that is warm or hot.

Wednesday Food Tip: Berries on the Edge!

It never fails! I always pick up a few cartons of berries at the store when I shop. Once home I clean them up with visions of eating them in so many different ways.

Inevitably and as hard as I might I never go for a fresh bowl of berries. Nor do I whip up something luscious with them. Instead, I’ll opt out and go for something like ice-cream or a piece of chocolate. Well, when given the choice anyway.

Therefore, what happens? Those beautiful berries get pushed back into the fridge and are lost for a while. Once I remember they’re there they look pretty sad. But still usable in some form.

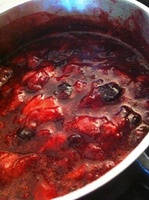
So here’s what I do. I cut off the stems and all yucky parts. Get rid of the moldy berries and those that surround them. Slice and put them in a small non-reactive sauce pan. Then cook them for 1-hour. And I get a nice little fruit “sauce” to put on my ice-cream. Not bad, huh? Below are pictures I took of the cooking process so you know how the sauce should look.

By the way, any leftover berry will do.  Here I used straws and blues.  And always cook the berries over low heat; so as not to burn them. 

The beginning, at 20 minutes and at 1-hour consecutively.